
Real-Time Audio Streaming API: Live Meeting Audio over WebSocket

Post-call transcription is not enough when your product needs to react while a meeting is happening. For AI meeting agents, live sales coaching, or in-call compliance alerts, waiting for a recording to process is too slow. You need access to the conversation as it happens, which requires a real-time audio streaming API.
This is the sensory input for modern AI voice agents that can join meetings as active participants. Instead of just analyzing a meeting after it ends, they can hear, understand, and act in the moment. At MeetStream, we've processed over 1,000,000 meeting minutes and have seen that the most effective AI meeting products are built on live data.
A real-time audio streaming API works by sending a bot into a Zoom, Microsoft Teams, or Google Meet call. The bot captures audio and streams it directly to your application over a WebSocket connection. This gives you a raw, low-latency feed of the conversation for immediate processing.
This tutorial shows how to build a live audio pipeline that receives speaker-tagged audio from any major meeting platform. Let's get into it.
Why Post-Call Processing Is Not Enough
Traditional meeting workflows are asynchronous. You record a call, wait for it to end, process the recording, and then send the audio file to a transcription service. This model works for generating summaries and notes after the fact, but it breaks down when your application needs to interact with a live meeting.
The delay between when something is said and when your application knows about it can be several minutes. For an AI agent that needs to answer a question, a sales tool that provides live talking points, or a compliance system that must flag keywords immediately, this delay makes the product unusable. These applications require a synchronous, real-time approach.
How Real-Time Audio Streaming Works
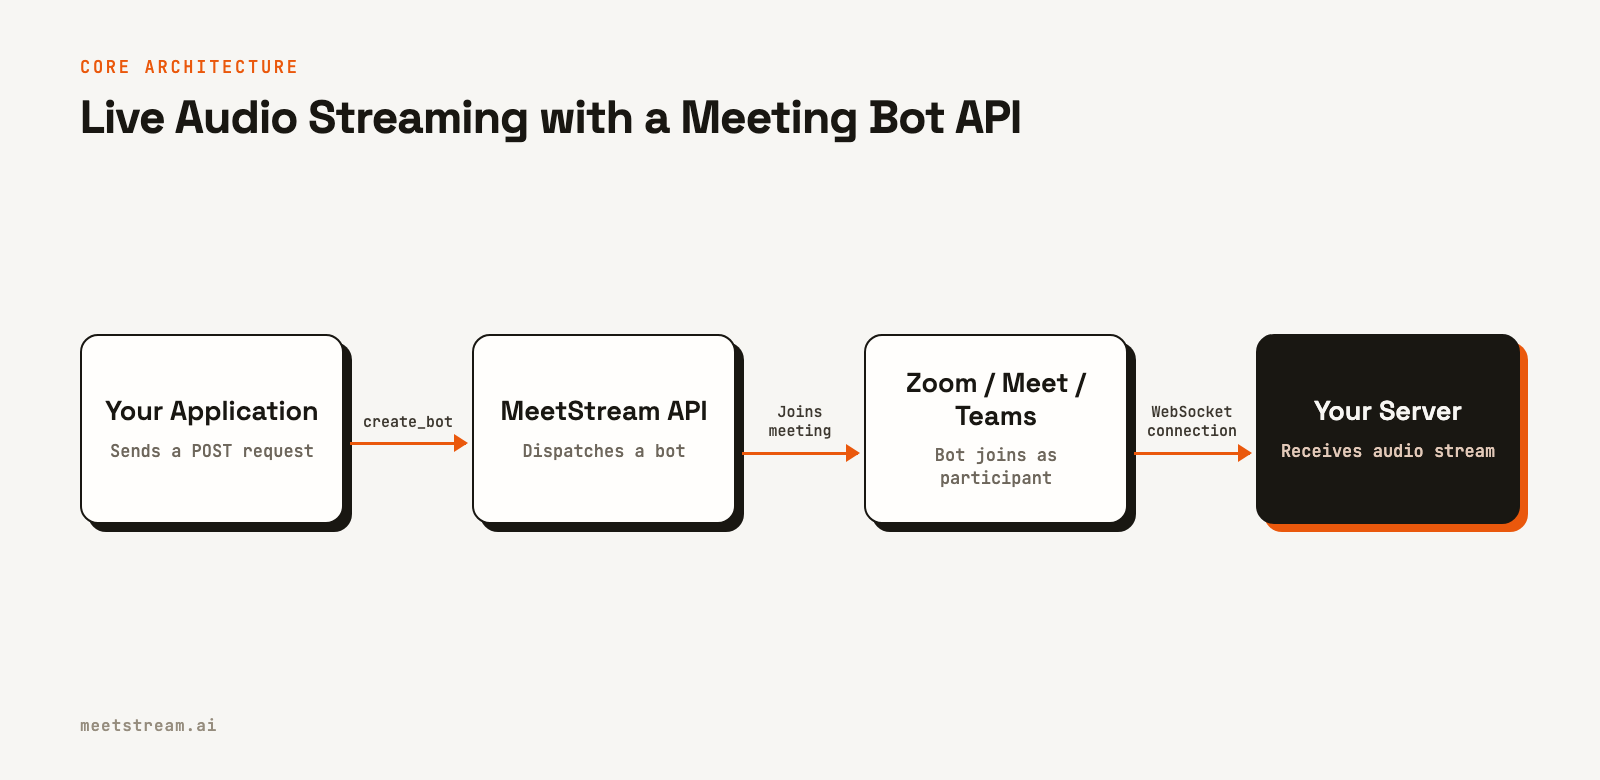
A real-time audio stream from a meeting involves three main components: your application, a meeting bot API, and your server. The process is straightforward: your application makes an API call to deploy a bot, the bot joins the meeting as a participant, and it establishes a persistent connection to stream audio data to your server.
Here's how it works under the hood:
- Bot Creation: Your application sends a
POSTrequest to the MeetStream API with the meeting URL and a WebSocket URL hosted on your server. - Bot Joins Meeting: MeetStream dispatches a bot that joins the specified Zoom, Google Meet, or Teams call, just like a human participant.
- WebSocket Connection: Once in the meeting, the bot connects to your WebSocket URL and begins sending a continuous stream of audio data.
- Audio Processing: Your server receives binary frames of audio data. Each frame is tagged with speaker information and contains raw PCM audio, ready for transcription, analysis, or forwarding to another service.
This architecture decouples your application from the complexities of each meeting platform. You interact with a single, consistent real-time audio API, not three different SDKs.
Building a Live Audio Pipeline: Step-by-Step
This guide walks through the sample code from MeetStream Labs. You will build a server that receives a live audio stream from a meeting and can forward it to a transcription service like Deepgram or AssemblyAI.
Prerequisites
- Node.js v18 or newer
- A free MeetStream API key from
app.meetstream.ai - A free ngrok auth token for local development
First, clone the example repository and set up your environment variables.
git clone https://github.com/meetstream-ai/labs
cd labs/audio-streaming
npm install
cp .env.example .env
Now, edit the .env file with your API keys and a meeting link.
MEETSTREAM_API_KEY=your_meetstream_api_key
NGROK_AUTHTOKEN=your_ngrok_authtoken
MEETING_LINK=https://meet.google.com/xxx-xxxx-xxx
Step 1: Start a Local Server with a Public URL
MeetStream needs a public URL to connect its WebSocket to your server. During development, ngrok can create a secure tunnel to your local machine. The sample code handles this for you.
const listener = await ngrok.connect({
  addr: PORT,
  authtoken: process.env.NGROK_AUTHTOKEN,
});

const publicUrl = listener.url();
const callbackUrl = `${publicUrl}/webhook/callback`;
const audioWsUrl = `${publicUrl.replace("https://", "wss://")}/audio`;
The script generates a public base URL and derives two specific endpoints from it: a callbackUrl for lifecycle webhooks and an audioWsUrl for the raw audio stream. These URLs must be active before you create the bot.
Step 2: Create a Bot and Request the Audio Stream
With your server running, you can now ask MeetStream to send a bot to your meeting. The key is the live_audio_required parameter in the request body, which tells MeetStream where to send the audio.
await fetch("https://api.meetstream.ai/api/v1/bots/create_bot", {
  method: "POST",
  headers: {
    Authorization: `Token ${apiKey}`,
    "Content-Type": "application/json",
  },
  body: JSON.stringify({
    meeting_link: meetingLink,
    bot_name: "Audio Bot",
    callback_url: callbackUrl,
    live_audio_required: {
      websocket_url: audioWsUrl,
    },
  }),
});
This API call instructs MeetStream to join the meeting specified in meeting_link and, upon joining, to establish a WebSocket connection to your audioWsUrl. This is the fundamental difference between simple recording and building a live audio product.
Step 3: Handle the Incoming WebSocket Audio
Once the bot is in the meeting, MeetStream connects to your /audio WebSocket endpoint and begins sending binary frames. Each frame contains the speaker's name and ID, along with the raw audio data.
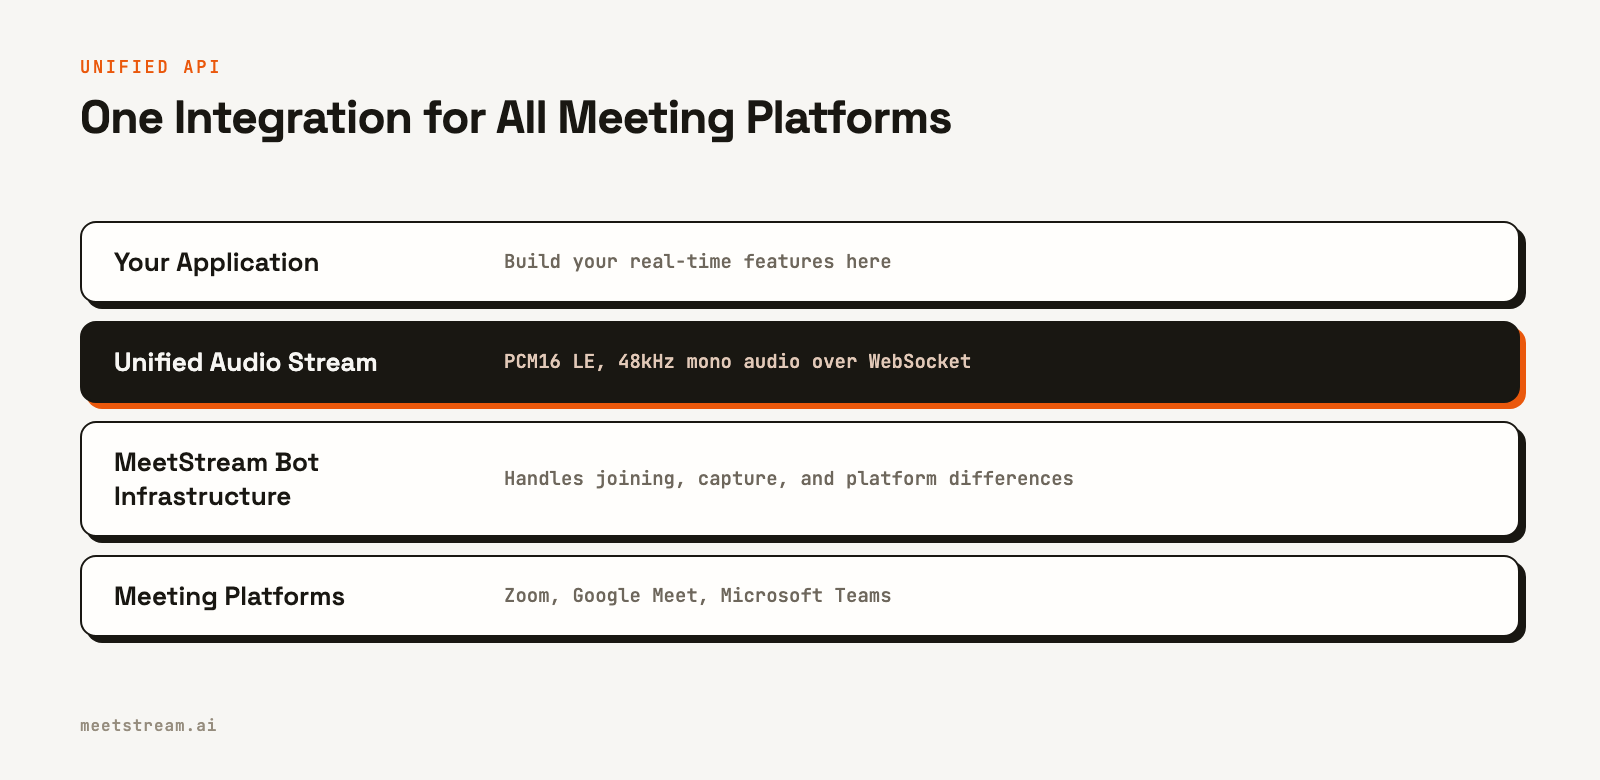
The audio format is PCM16 little-endian at 48,000 Hz, mono. This is a standard, uncompressed format that is easy to work with and compatible with most transcription and voice AI services.
The server handler parses each frame to extract the speaker and the audio payload.
handleFrame(buffer) {
  const speakerName = getSpeakerName(buffer);
  const pcm = getAudioPayload(buffer);

  this.broadcaster.broadcast(speakerName, pcm);
  writeToSpeakerArchive(speakerName, pcm);
}
This example code does two things with the audio: it rebroadcasts the live stream to any connected clients and saves the audio to per-speaker files for later review. This is the core of your meeting audio pipeline.
Step 4: Connect a Transcription Service
With the audio stream flowing to your server, you can forward it to any third-party service. The sample project includes a bridge script for connecting to providers like Deepgram and AssemblyAI.
Set your provider and API key in the .env file:
STT_PROVIDER=deepgram
DEEPGRAM_API_KEY=your_deepgram_api_key
Then run the main server and the bridge script in two separate terminals.
# Terminal 1
npm start

# Terminal 2
npm run bridge
The bridge connects to your local server's broadcast, receives the live audio, and forwards it to the specified provider for real-time transcription. This modular approach lets you swap transcription providers without changing your core bot integration.
Real-World Use Cases for Live Meeting Audio
A real-time audio stream is a building block for many applications that need to understand and react to conversations as they unfold.
- AI Notetakers: Go beyond post-call summaries by extracting action items, decisions, and key topics in real time, making them available inside your application while the meeting is still in progress.
- Sales Coaching: Analyze live sales calls to detect objections, competitor mentions, or buyer intent signals. Provide real-time prompts and suggestions to sales reps to help them navigate conversations effectively.
- Compliance Monitoring: In regulated industries, you can monitor calls for required disclosures or restricted language, triggering instant alerts for compliance officers.
- Voice-Controlled Applications: Build interactive meeting agents that can respond to voice commands, answer questions, or perform actions like creating a support ticket based on the live conversation.
What to Watch Out For with Real-Time Audio
Working with live audio streams presents a different set of challenges than processing files. A few things to keep in mind:
- Network Latency: The connection between MeetStream and your server is critical. Ensure your WebSocket server is reliable and geographically located to minimize latency for your users.
- Handling Silence: Meetings have periods of silence. Your application should be prepared to handle gaps in the audio stream without timing out or breaking. No audio frames will be sent when no one is speaking.
- Waiting Rooms: A bot may be placed in a waiting room or lobby, especially in Google Meet. Your application should handle the
bot.in_waiting_roomwebhook event and have a strategy for admission. - Speaker Attribution: While our system provides speaker-tagged audio, attribution can take a few seconds to initialize at the start of a call. The first few audio frames might have an "Unidentified Speaker" tag.
How MeetStream Provides a Unified Audio Stream
Building and maintaining separate media capture integrations for Zoom, Google Meet, and Microsoft Teams is a significant engineering effort. Each platform has its own SDK, authentication model, and audio format. The MeetStream Meeting Bot API provides a single point of integration.
You send a meeting link, and we handle the platform-specific details of joining the call and capturing audio. Your application receives a clean, consistent stream of speaker-tagged PCM audio regardless of the underlying platform. This lets your team focus on building your product's core features, not on infrastructure.
Conclusion
If your product only needs a transcript after a meeting, a post-call workflow is sufficient. But if your product needs to understand, analyze, or react to a conversation in the moment, you need a live audio stream. A real-time audio streaming API is the most direct way to get this data from platforms like Zoom, Google Meet, and Teams.
By using a bot-based API, you get a reliable audio feed over a WebSocket, allowing you to build powerful, interactive AI applications without managing complex media infrastructure. See the full API reference at docs.meetstream.ai.
Frequently Asked Questions
How do I stream real-time audio from Zoom and Google Meet?
Use a meeting bot API that joins the call and forwards the audio. With MeetStream, you provide a meeting link and a WebSocket URL in an API call. A bot joins the meeting and streams live, speaker-tagged audio directly to your server.
What is the easiest way to get a live audio stream from a Zoom meeting?
The most direct method is using a third-party API like MeetStream. This avoids building on the Zoom SDK directly and provides a simple WebSocket-based stream, abstracting away the complexity of audio capture and processing for your Zoom meeting bot.
Can I get per-participant audio streams?
MeetStream provides a mixed audio stream with dominant speaker tags. For Zoom, fully isolated per-participant audio is available. For Google Meet and Teams, the stream is a mix with speaker attribution for up to three concurrent speakers.
How does WebSocket audio streaming work for meeting bots?
A meeting bot joins a call as a participant and captures the audio. It then packages this audio into small binary frames and sends them continuously over an open WebSocket connection to your server. This allows your application to process audio with very low latency.
Can I use this to build a voice AI agent?
Yes, a live audio stream is the essential input for a voice agent. The bot handles joining the call and capturing audio. You can then feed this audio into a speech-to-text model and an LLM to enable your agent to understand and respond to the meeting in real time.