
How to Build a Post-Call Transcription Bot with MeetStream

Getting a clean, speaker-labeled transcript after a meeting ends is a foundational task for many AI products. Yet building the infrastructure to reliably join a call, record it, and process the audio is complex. You need to handle different meeting platforms, manage bot lifecycles, and wire up a speech-to-text pipeline.
This process has become much simpler with modern APIs. The core challenge is no longer deploying bots, but orchestrating the data flow: triggering the recording, getting notified when the transcript is ready, and fetching the final output. MeetStream is an agent-first platform that provides the voice infrastructure for meetings, turning this entire workflow into a few API calls.
A post-call transcription bot is an automated participant that joins a meeting, records the audio, and delivers a full transcript after the meeting concludes. This is different from real-time transcription, which streams text as it's spoken. The post-call approach allows for higher accuracy because the transcription engine can analyze the entire audio file for context.
This tutorial walks through building a complete post-call transcription bot using Node.js. We will cover creating the bot, handling webhooks to know when the transcript is ready, and fetching the final speaker-diarized text. Let's get into it.
Why Post-Call Transcription is a Common Starting Point
For developers building on top of meeting data, post-call transcription is often the first integration. It's a reliable way to get the ground truth of a conversation without the complexities of real-time streaming. The workflow is asynchronous, which fits well with background processing jobs like generating summaries, extracting action items, or logging call details to a CRM.
The main engineering challenge is the state management. Your application sends a bot into a meeting that might last five minutes or two hours. You can't just block and wait for a response. Instead, you need a mechanism to be notified when the work is done. This is where webhooks become essential. A well-designed system fires a request to create the bot and then waits for an event to signal that the transcript is ready to be retrieved.
The Post-Call Transcription Workflow
The entire process involves three API interactions. This separation of concerns makes the system resilient. Your application isn't responsible for the recording or transcription itself, only for initiating the job and handling the result.
- Create the bot: Your application sends a
POSTrequest to the MeetStream API with a meeting link and acallback_urlfor webhooks. The API immediately responds with abot_idand atranscript_id. You should store these IDs. - Receive webhook events: Once the meeting ends and the audio has been processed, MeetStream sends a
POSTrequest to yourcallback_url. The payload of this request contains abot_eventfield. You listen for thetranscription.processedevent. - Fetch the transcript: Upon receiving the
transcription.processedevent, your application uses the storedtranscript_idto make aGETrequest to the transcript endpoint and retrieve the full, speaker-labeled text.
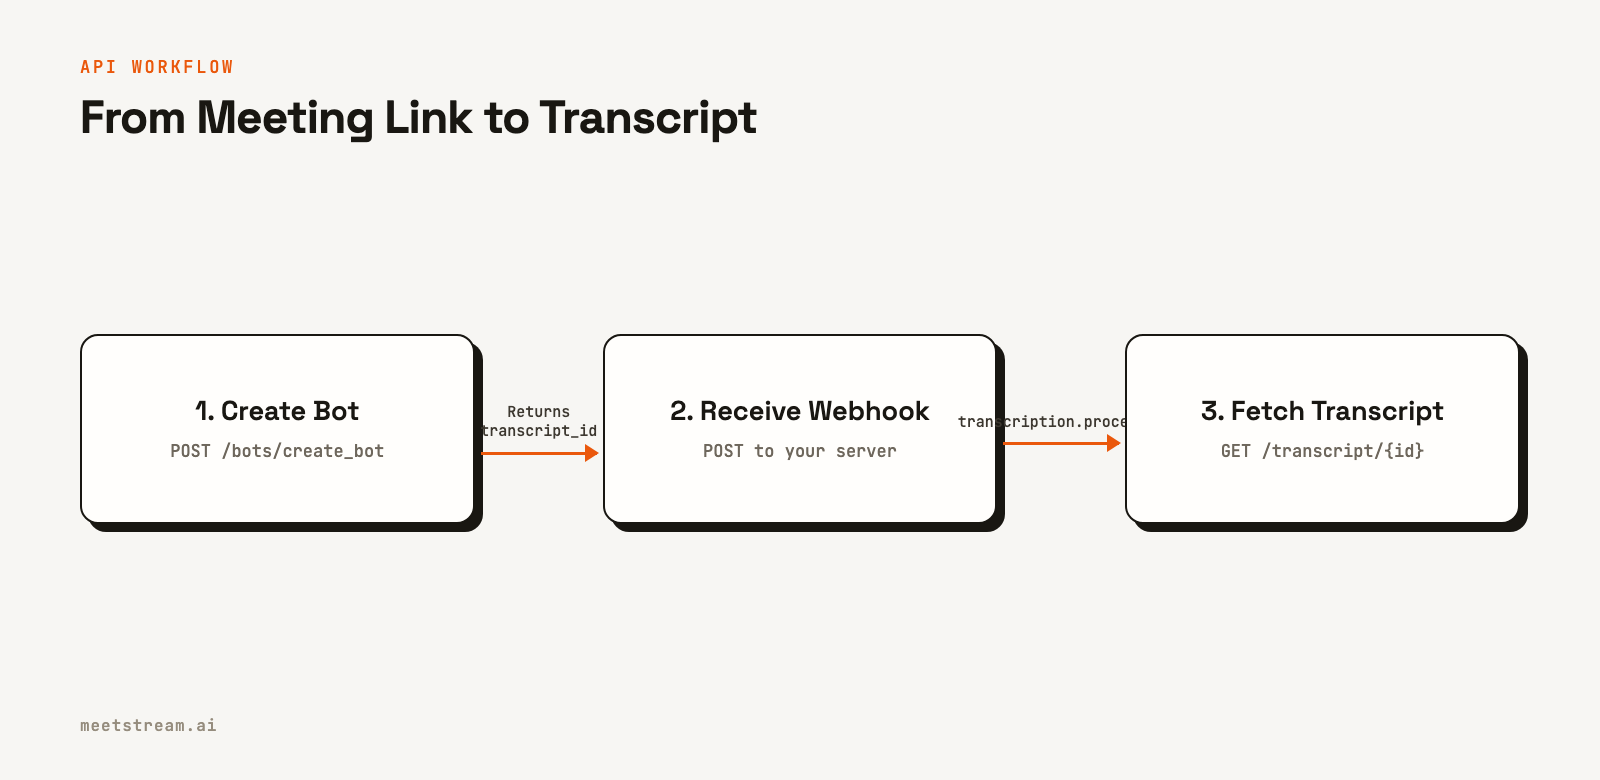
This event-driven architecture is efficient and scalable. Your server only needs to handle two short-lived requests: one to start the process and one to fetch the result. The heavy lifting of joining the call, recording, and transcribing happens on MeetStream's managed infrastructure.
Building the Bot: Step-by-Step
This guide uses Node.js, Express for the webhook server, and the @ngrok/ngrok package to create a public URL for local development. You will need a MeetStream API key to get started.
Project Setup
First, set up your project directory and install the necessary dependencies.
mkdir post-call-transcription
cd post-call-transcription
npm init -y
npm install express axios dotenv @ngrok/ngrok
Create a .env file in the root of your project to store your credentials and configuration. The @ngrok/ngrok package requires an authtoken, which you can get from the ngrok dashboard.
MEETSTREAM_API_KEY=your_meetstream_api_key
MEETING_LINK=https://meet.google.com/xxx-xxxx-xxx
NGROK_AUTHTOKEN=your_ngrok_authtoken
PORT=3000
Step 1: Create a Public URL with a Tunnel
MeetStream needs to send webhooks to a public URL. During development, ngrok can provide one that forwards to your local machine. The @ngrok/ngrok library lets us start this tunnel programmatically.
src/tunnel.js
const ngrok = require("@ngrok/ngrok");

async function startTunnel(port) {
  const listener = await ngrok.forward({
    addr: port,
    authtoken: process.env.NGROK_AUTHTOKEN,
  });

  const url = listener.url();
  console.log(`Tunnel live → ${url}`);
  return url;
}

module.exports = { startTunnel };
Step 2: Create the Bot via API
Next, we'll write a function to call the create_bot endpoint. We pass the meeting link, our public webhook URL, and a recording_config. This config tells MeetStream to enable transcription. The API response includes the transcript_id we'll need later.
src/bot.js
const axios = require("axios");

const API_BASE = "https://api.meetstream.ai/api/v1";

async function createBot(meetingLink, webhookUrl) {
  const { data } = await axios.post(
    `${API_BASE}/bots/create_bot`,
    {
      meeting_link: meetingLink,
      bot_name: "Transcription Bot",
      video_required: false,
      callback_url: webhookUrl,
      recording_config: {
        transcript: {
          provider: {
            meetstream: {},
          },
        },
      },
    },
    {
      headers: {
        Authorization: `Token ${process.env.MEETSTREAM_API_KEY}`,
        "Content-Type": "application/json",
      },
    }
  );

  console.log(`Bot created, bot_id: ${data.bot_id}`);
  console.log(`Transcript ID: ${data.transcript_id}`);

  // Store for the webhook handler to access
  process.env._TRANSCRIPT_ID = data.transcript_id;
  return data;
}

module.exports = { createBot };
The recording_config block is flexible. Here we use MeetStream's native engine, but you can also specify other providers like Deepgram or AssemblyAI. You can find the full list in the post-call transcription docs.
Step 3: Handle Incoming Webhook Events
Our Express server will listen for POST requests from MeetStream. It's critical to respond with a 200 status code immediately before processing the event. MeetStream webhooks are best-effort and will not be retried on a non-2xx response.
src/webhook.js
const express = require("express");
const { fetchTranscript } = require("./transcript");

function startWebhookServer(port, onReady) {
  const app = express();
  app.use(express.json());

  app.post("/webhook", (req, res) => {
    res.status(200).json({ received: true }); // Acknowledge immediately
    handleEvent(req.body);                    // Then process the payload
  });

  app.listen(port, () => {
    console.log(`Webhook server listening on port ${port}`);
    if (onReady) onReady();
  });
}

function handleEvent({ bot_event, bot_id, bot_status }) {
  console.log(`[${bot_id}] Received event: ${bot_event}`);
  switch (bot_event) {
    case "bot.inmeeting":
      console.log(`[${bot_id}] Recording started.`);
      break;

    case "bot.stopped":
      console.log(`[${bot_id}] Meeting ended, status: ${bot_status}`);
      break;

    case "transcription.processed":
      console.log(`[${bot_id}] Transcription is ready. Fetching...`);
      fetchTranscript(process.env._TRANSCRIPT_ID);
      break;
  }
}

module.exports = { startWebhookServer };
The code uses bot_event to identify the event type. While other events like bot.inmeeting are useful for logging, our action is triggered only by transcription.processed.
Step 4: Fetch and Save the Transcript
Once the webhook fires, this function retrieves the transcript data. The API response is a JSON array of segments, each containing the speaker and their words. We'll parse this and save it as both a raw JSON file and a clean TXT file for readability.
src/transcript.js
const axios = require("axios");
const fs = require("fs");
const path = require("path");

const API_BASE = "https://api.meetstream.ai/api/v1";

async function fetchTranscript(transcriptId) {
  try {
    const { data } = await axios.get(
      `${API_BASE}/transcript/${transcriptId}/get_transcript`,
      {
        headers: {
          Authorization: `Token ${process.env.MEETSTREAM_API_KEY}`,
        },
      }
    );
    saveTranscript(transcriptId, data);
  } catch (err) {
    console.error(`Error fetching transcript ${transcriptId}:`, err.message);
  }
}

function saveTranscript(transcriptId, data) {
  const outputDir = path.join(__dirname, "..", "transcripts");
  if (!fs.existsSync(outputDir)) {
    fs.mkdirSync(outputDir);
  }

  const jsonPath = path.join(outputDir, `${transcriptId}.json`);
  fs.writeFileSync(jsonPath, JSON.stringify(data, null, 2));
  console.log(`Saved raw transcript to ${jsonPath}`);

  // Create a human-readable text version
  let readableTranscript = "";
  let lastSpeaker = null;

  // The API returns a list of segments
  if (Array.isArray(data)) {
    data.forEach(segment => {
      const currentSpeaker = segment.speaker || "Unknown";
      if (currentSpeaker !== lastSpeaker) {
        readableTranscript += `\n${currentSpeaker}:\n`;
        lastSpeaker = currentSpeaker;
      }
      readableTranscript += `${segment.transcript}\n`;
    });
  }

  const txtPath = path.join(outputDir, `${transcriptId}.txt`);
  fs.writeFileSync(txtPath, readableTranscript.trim());
  console.log(`Saved readable transcript to ${txtPath}`);

  // Exit after saving
  process.exit(0);
}

module.exports = { fetchTranscript };
Step 5: Wire It All Together
Finally, an entry point script starts the tunnel, then the webhook server, and once the server is ready, it creates the bot.
index.js
require("dotenv").config();

const { startTunnel } = require("./src/tunnel");
const { createBot } = require("./src/bot");
const { startWebhookServer } = require("./src/webhook");

const PORT = parseInt(process.env.PORT || "3000", 10);

(async () => {
  try {
    const tunnelUrl = await startTunnel(PORT);
    const webhookUrl = `${tunnelUrl}/webhook`;

    startWebhookServer(PORT, () => {
      createBot(process.env.MEETING_LINK, webhookUrl);
    });
  } catch (e) {
    console.error("Failed to start application:", e.message);
    process.exit(1);
  }
})();
To run the application, execute node index.js. It will print the tunnel URL, create the bot, and wait for the meeting to end to receive the webhook and fetch the transcript.
Real-World Use Cases for Transcribed Meetings
With a reliable source of post-call transcripts, you can build a wide variety of features. This bot is the first step in a data pipeline that can power more advanced applications.
- AI Meeting Summaries: Feed the final transcript into a large language model (LLM) to automatically generate summaries, identify key decisions, and extract action items.
- Sales Coaching: Analyze sales call transcripts to identify talk-to-listen ratios, track mentions of competitors, and detect customer objections. This data can be used to build automated coaching tools.
- CRM Integration: After a customer call, parse the transcript to find contact information, deal updates, or follow-up tasks, then automatically update the relevant records in a CRM like Salesforce or HubSpot.
- Compliance and Auditing: For regulated industries, storing a complete and accurate transcript of every meeting provides a searchable audit trail for compliance purposes.
Common Issues and How to Handle Them
At MeetStream, we've processed over a million meeting minutes, and we see a few common patterns that can trip developers up when building a meeting bot API integration.
- Webhook URL Unreachable: The most common issue is an incorrect or inaccessible
callback_url. Always double-check that your URL is public and your server is running. A simple/healthendpoint that you can hit from a browser is a good way to test connectivity. - Ignoring 2xx Response Rule: If your webhook handler takes too long to process and doesn't send a 200 OK response quickly, the event delivery might be marked as failed. Always acknowledge the request first, then process the data asynchronously.
- No Transcript Produced: If you receive a
bot.stoppedevent but nevertranscription.processed, check yourcreate_botrequest. You must include therecording_configobject to enable transcription. - Process Hangs After Completion: The Node.js process will not exit on its own because the Express server is still listening for connections. We added
process.exit(0)in thesaveTranscriptfunction to ensure a clean exit after the work is done.
How MeetStream Simplifies Post-Call Transcription
MeetStream provides the managed infrastructure to handle the entire lifecycle of a meeting bot. Instead of building and scaling a fleet of virtual machines to run bot instances, you interact with a simple REST API.
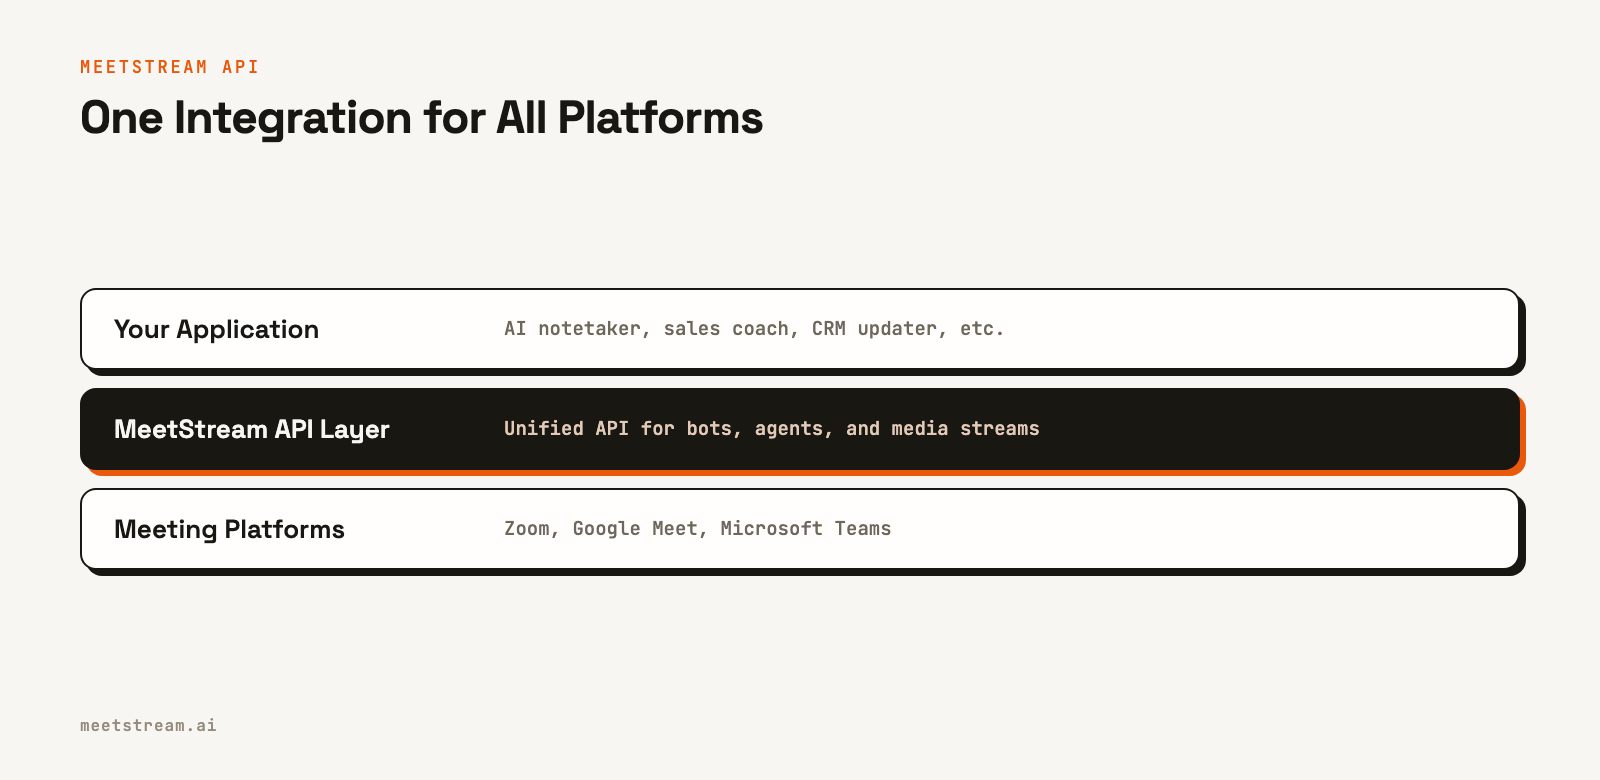
Our platform handles joining the meeting, capturing high-quality audio, and running the transcription pipeline. For developers, this means you can focus on your application's core logic rather than on the underlying infrastructure. A single integration gives you access to Zoom, Google Meet, and Microsoft Teams, with a consistent data format for transcripts and events across all platforms.
While this guide focuses on post-call transcription, MeetStream is an agent-first platform designed for building interactive AI voice agents that can hear, speak, and act in meetings. Post-call data is just one of the outputs our infrastructure can produce.
Conclusion
Building a post-call transcription bot is a practical way to start working with meeting data. The asynchronous, webhook-driven pattern shown here is a reliable foundation for more complex applications. By offloading the bot infrastructure and transcription pipeline to a platform like MeetStream, you can get from a meeting link to a structured transcript with just a few API calls.
See the full API reference at docs.meetstream.ai.
Frequently Asked Questions
What is post-call transcription?
Post-call transcription is the process of converting the audio from a recorded meeting into a text file after the meeting has ended. This method allows the entire audio to be analyzed at once, which can lead to higher accuracy and better speaker labels compared to real-time transcription.
How do you get a transcript after a Zoom meeting?
You can use an API like MeetStream to automatically have a bot join, record, and transcribe a Zoom meeting. By providing the Zoom link to the API, you can receive a webhook notification when the transcript is ready and then download the full text with speaker labels.
Can you transcribe a meeting with multiple speakers?
Yes. Modern transcription services use a process called diarization to identify who spoke when. The resulting transcript attributes each line of text to a specific speaker, making it easy to follow the conversation.
How do webhooks work for transcription APIs?
When you request a transcription, you provide a public URL (a webhook). The API service performs the transcription as a background job. Once it's complete, the service sends an HTTP POST request to your URL with a payload indicating the job is done, at which point you can fetch the result.
What is the difference between real-time and post-call transcription?
The main difference is latency and processing scope. Real-time vs post-call transcription is a key choice: real-time provides text within seconds but may be less accurate, while post-call takes longer but can analyze the full context of the conversation for better results.